A Day in the Life Too... a blog about modest style

A 30-something mom's blog about modest style, DIY stuff, and limiting dessert. Just kidding. We eat dessert first around here.

** Check out this post for an awesome way to build a totally customized, modest wedding gown...and save 10% with coupon code! **
Showing posts with label home project. Show all posts

Friday, January 11, 2013

How to Make a Headboard out of Pallet Wood

Sorry if you're sick of these home projects updates of mine, friends, but I've just got to tell you: I'm always (yes, ALways) up for something free and thought maybe one or two of you are, too. 
 
And pallet boards are free. Headboards, typically, are not.
 
Therefore, I present to you:


A step-by-step tutorial for how to make one yourself.
 
And truthfully? If I can do it, anyone can. Plus, hello, did I mention it's $free$?
 
I did? Twice now? Oh. Okay.
 
xox,
Brittney


Thursday, January 3, 2013

DIY Animal Bookends

Sorry, but I just can't help sharing these. I think they're fantastic...even if no one alive knows what the heck kind of animal that is.


And you can make some, too! So so easily!


Check out how, here.

xox
Brittney

Sunday, December 30, 2012

Ombre + Ruching + DIY = Colorful Bliss

If you love ombre, and you love ruching, you just might love this little DIY project I did this month...either for yourself or the favorite little girls in your life.
 
 
That's right. An ombred ruched duvet cover...out of a plain ol' cheap ol' Walmart flat sheet. I don't think it gets cuter than this. Really.
 
Come on over and check it out!

Thursday, November 15, 2012

Gift idea: DIY Tray (out of an old Photo Frame)

Got kids?
 
Got parents to get gifts for?
 
Got limited funds?
 
Get this: Take an old photo frame and make a snack tray out of it!
 
 
Wrap it up, give it to your parents, and let your kids feel so proud when your parents open it up and LOVE it.
 
Or just make one for yourself. Because it's pretty.

 
Check out more about this tray here.
 
And have a lovely Thanksgiving!

Friday, October 26, 2012

Harlequin diamonds, anyone?

You guys, I'm a sucker for argyle. It's the inherent nerdiness in me -- I blame genetics, you know. Just can't help it.
 
The home-dec version of argyle, as far as I'm concerned, is harlequin diamonds. And I've been wanting to do something like this little DIY project forEVer:

 
Fortunately for me, Forever arrived earlier this week.
 
Come see how you can do one, too! Or just check out my house stuff in general. Just because it's fun.

Monday, October 1, 2012

Brains & Their Juices....or Hey, Nice To See You

You guys... You all know me well enough by now that I don't mind you rolling your eyes at me. In fact, most of the time I'll beat you to it.
 
But some seriously great stuff is happening in my brain lately. And it's called: Creative Juices Are Flowing.
 
 
And, although they're not as good as Minute Maid 5-calorie Lemonade juices (that stuff is delicious), these creative juices are making me both happy AND productive. So.
 
Red rover red rover,


Tuesday, February 28, 2012

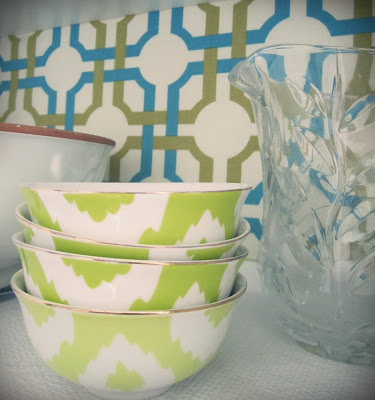
HomeStyle: Fabric-backed Kitchen Cupboards

You guys, I have a sickness. And it's called "I can't stop doing stuff in my house." Now, this wouldn't be a problem if it was useful stuff, like laundry and vacuuming and cooking. However (and unfortunately for my family who happens to enjoy a delicious dinner or two), it usually involves messes spread over all available surfaces and lots of paint.

This project was on the smaller scale (much to everyone's relief) but it just might rank among my favorites thus far. Inspired by this post, and because my one open cabinet was woefully dark and overstuffed and lame, annnnnnd because it's visible right when you walk into the front door, I decided to amp up the style factor and tackle the fabric-backed cupboard for a fresh new look.


Actually, I had attempted face-lifting this particular cupboard recently in the past, but I chose paint that was the total wrong color and I then filled the dang thing too full of random dishes so it looked, in a word, stupid. (You know it's serious when I use the "S-word," which is a pretty big no-no around here.)

For $2.50, I bought a piece of foam board at WallyWorld, cut it to size, and pretty much followed the tutorial I linked to above. Fortunately, I had some fabric left over from this project that would work in the kitchen, so I used that.

Then I edited my already meager collection of displayable dishware because I'm trying to embrace the adage "less is more." (I believe this in many instances, but it's often hard for me to narrow things down. Which is why my posts, like this one, are wordier than necessary. Heh.)


It's a work in progress (my whole house is, frankly, and I'm loving it!), but it's a start. And it took about 30 minutes to do and clean up. Which means there's room on the countertops to make dinner and chocolate cake, nearly half of which I may or may not have consumed already.


My husband's reaction to the cupboard: "Wow. Fancy." No exclamation points (he's not one to become weepy over, say, a photo of someone's beautiful interior like I am), but he likes it. Phew.

Happy Tuesday.

Monday, February 27, 2012

HomeStyle: Vintage Button Art

Inspired by this post (and every other post on her blog, let's be honest) and having been given many vintage buttons from my mom (and my MIL's having a fine collection useful for filling in the color gaps), I decided to make a piece of vintage button art for the nursery.

 I had an old, ugly frame with an old, ugly rooster pic attached directly to it. Perfect. After a quick spray painting and light distressing of the frame, it was ready to go.

My kids helped me pick out the buttons. Since it was going into the nursery, my girls thought the baby would most appreciate a rainbow formation. Easy enough. I spray-adhesed (awesome verb) some old burlappy cotton fabric over the ugly rooster art and, after spreading out all the buttons on the floor to get the layout right, I began gluing them to the framed fabric.

To me, few things beat heirloom buttons. So much diversity and strangeness and awesomeness in the buttons' design and colors.


I did add some contrasting thread to some of the simpler buttons, just for interest... and because I'm addicted to pairing red with aqua these days.


I really like how it turned out. I can sit and study this thing for a long time, because the buttons themselves are so interesting individually and collectively. And I like the textural contrast of the organic cotton fabric.

Overall, I think it's perfect art for a nursery corner where, let's face it, many hours upon hours are going to be spent. Plus, total cost: $free$. Sweetness.


Happy Monday!

Thursday, February 2, 2012

HomeStyle: coffe table-turned padded bench

I found this little gem for cheap on craigslist late last summer. Wasn't she a beaut?


The best (worst) part was, I didn't know exactly what it was. A little too tall for a coffee table, too low for a sofa table, too big for an end table, too fill-in-the-blank for any kind of table that my house currently needed.

Still, I loved the two large drawers, the sturdy construction, and the details.


First stop: paint. It's a big enough piece that any kind of bright, awesome color (say, magenta or chartreuse) would've been a little overkill. I went with a classic military blue -- dark and grounded and colorful but not overpowering. (I find navy hues to be great that way.) Some round brass knobs and BAM. Done.

(Pretend you're looking at a photo of the above table in blue here.)

Not to be all anticlimatic at this point, but we had a hard time figuring out what to DO with it. We tried it as a coffee table, but, although the drawers were nice to hide TV remotes and old popcorn bowls on the fly (what, you don't do that?), the table sits a few inches uncomfortably higher than the cushions on our couch. We tried pushing it against a wall to serve as a kind of console, but it was pointlessly long and too low for that...thus too tempting for little bodies to top with miscellaneous junk that no one wants to put away (what, you don't have that?).

Enter: idea for bench. A padded one, no less. Perfect. We were in the process of replacing our master bed's old pillowtop mattress anyway, so I simply separated the pillowtop part from the rest of the mattress before hauling it off to the landfull. The foam was dense and a perfect thickness. Who loves repurposing stuff slated for Trashville? Two thumbs says: this guy.

I cut the foam to size, wrapped it with thin padding, stuck it on top of the table, and covered with upholstery fabric. For a final (although hardly noticeable) touch, I covered the rough stapled edges of the fabric with grosgrain ribbon.

The bench now sits in our living room.

 
What furniture have you guys found hard to incorporate into your house? Are you a blues-and-greys or browns-and-greens kind of home decorator? Or has there ever been a time in your life when a navyish color has swooped in and saved the day? Do tell.

Happy Thursday.
Related Posts Plugin for WordPress, Blogger...
Pin It button on image hover